fdonovan913 posted: " You know the saying, "April showers bring May flowers," right? Well, we're about to waltz right into April and into those rainy days that will bring beautiful blooms come May. Don't get caught in a storm without the proper rain gear though! These rainy-d"
You know the saying, "April showers bring May flowers," right? Well, we're about to waltz right into April and into those rainy days that will bring beautiful blooms come May. Don't get caught in a storm without the proper rain gear though! These rainy-day essentials for the whole family are stylish and convenient so you can handle those showers with ease. See our roundup below.
For Women
Frugal and Thriving may earn a small commission via affiliate links in post. See full disclosure here.
A rainy day doesn't mean you have to keep the beauty at bay! Light pink, bold yellow, and cool gray accessories can turn any downpour into a fashion show. Mix and match or go monochromatic...this rainy day is yours for the taking!
For Kids
Whether they're puddle jumping, walking home from the school bus, or heading out for that can't-miss play date, your kiddos will rock a rainy day in style with these fun, bright accessories.
For Men
Staying dry is manly and cool...trust us. Grab some muted-tone accessories for him and slay a rainy day while looking suave and sophisticated.
fdonovan913 posted: " It's time to say goodbye to hearty soups and heavy comfort foods and break out the healthy, crisp salad recipes! Springtime means lots of fresh fruits and veggies which make for plenty of yummy salads. See some of our favorite springtime salad recipes be"
It's time to say goodbye to hearty soups and heavy comfort foods and break out the healthy, crisp salad recipes! Springtime means lots of fresh fruits and veggies which make for plenty of yummy salads. See some of our favorite springtime salad recipes below.
Strawberry Salad
A little crunchy, a little creamy, and 100% mouthwateringly amazing, this strawberry salad is sure to become a family favorite!
Frugal and Thriving may earn a small commission via affiliate links in this post. See full disclosure here.
INGREDIENTS:
Container of fresh strawberries
Bag of spring mix
Candied pecans (or any nut of choice)
Crumbled goat cheese
Olive oil
Honey
Lemon juice
Salt
Pepper
DIRECTIONS:
Mix spring mix, strawberries, pecans, and goat cheese together in a bowl
For dressing, mix olive oil, honey, lemon juice, salt, and pepper in a jar and shake vigorously
Drizzle dressing over salad and enjoy!
Peach Salad
This salad is as sweet as a peach! This juicy, delectable dish can be served as a side or as an entree and will take you right from spring to summer.
INGREDIENTS:
2 peaches
Bag of spinach
1 avocado
Crumbled goat cheese
1/2 cup toasted sliced almonds
Diced chicken
DIRECTIONS:
Mix all ingredients together and drizzle with olive oil and balsamic vinegar or your favorite dressing (like lemon poppyseed)!
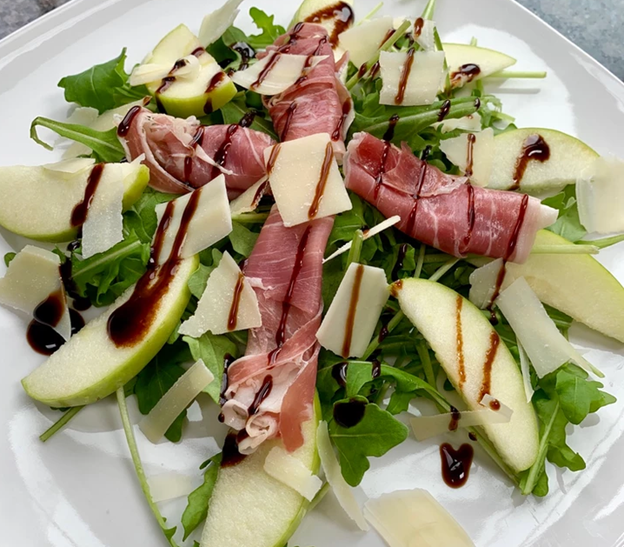
Arugula Salad
This arugula salad is crisp and fresh! The bitter arugula and apple are balanced out with salty prosciutto and nutty Parmesan cheese, making a perfect combination of flavors.
INGREDIENTS:
Sliced Granny Smith apples
Bag of arugula
Sliced prosciutto
Shaved Parmesan cheese
Balsamic glaze
Extra virgin olive oil
DIRECTIONS:
Add arugula to plate or bowl
Top with apple and prosciutto slices
Garnish with Parmesan cheese
Drizzle with EVOO and balsamic glaze
Enjoy!!
Mediterranean Salad
This Mediterranean salad is a little on the heartier side and makes a great springtime dinner for the whole family. It's quick, easy, and absolutely delicious.
INGREDIENTS:
Cucumbers
Greek olives
Cherry tomatoes
1/3 cup Bobs Redmill whole wheat cous cous
2 Gilberts caprese chicken sausage links
1/3 cup pearl mozzarella
Balsamic vinegar
Extra virgin olive oil
Pepper
DIRECTIONS:
Cook the cous cous in about 1/2 cup of water until absorbed and soft
Sauté the sausage on the stovetop until cooked
Cut your veggies and place in a bowl
Let cous cous and sausage cool before adding veggies
Mix in mozzarella and season with fresh pepper
Drizzle with olive oil and balsamic vinegar
Toss and serve!
Thanks for reading! Which of these springtime salads makes your mouth water? Let us know xo.
fdonovan913 posted: " The kitchen is the heart of the house. It's the command center where family and friends gather all throughout the day and where meals and memories are made. With all the time spent in the kitchen, you want it to be someplace that is clean yet inviting, a"
The kitchen is the heart of the house. It's the command center where family and friends gather all throughout the day and where meals and memories are made. With all the time spent in the kitchen, you want it to be someplace that is clean yet inviting, and a space that feels like home. If your current kitchen isn't exactly your dream kitchen, sprucing it up is a project that you can do on your own, for less money than you may think! Kristy took her kitchen from a classic okay to a bright, contemporary NO WAY!!! Check out her DIY kitchen redo.
Frugal and Thriving may earn a small commission via affiliate links in this post. See full disclosure here.
Talk about a transformation!! Wanna know exactly how this happened? Read Kristy's remodel process from her point of view below.
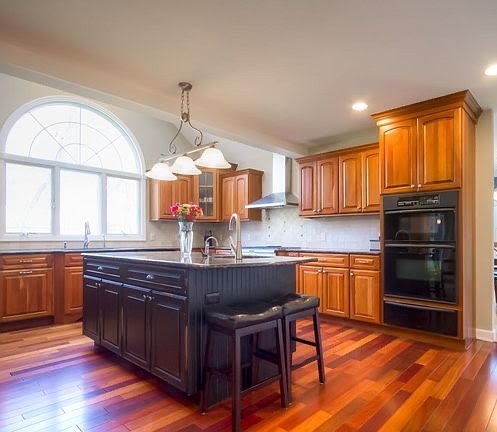
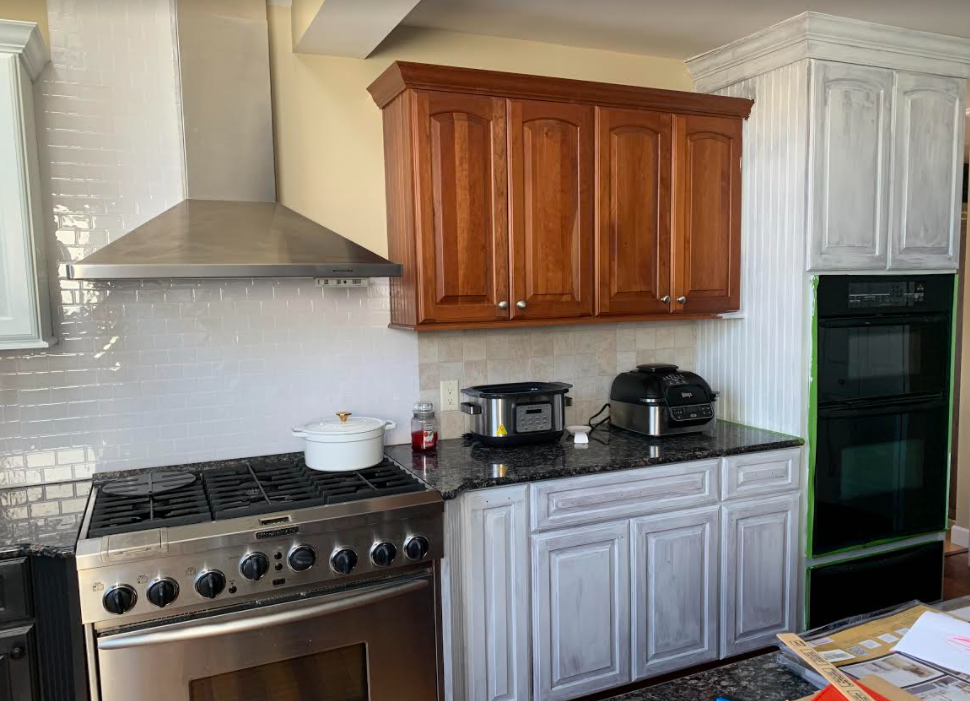
Before
Taking on this kitchen redo is something I've wanted to do for a while now, but to say I second-guessed this project on multiple occasions would be an understatement. I tried to talk myself out of it so many times because I was afraid to really mess something up...I mean this kitchen is the MAIN reason I wanted this home, and I didn't want to ruin it!! But I did my research (hours and hours of it!) and really tried to mentally prepare myself for what I was getting into. It was definitely a little stressful, but I just kept envisioning the final product and how much happier I would be with my gorgeous new kitchen!! To be completely honest, this is what got me through this project, but I am so thrilled with the end result that all of the worrying was well worth it!
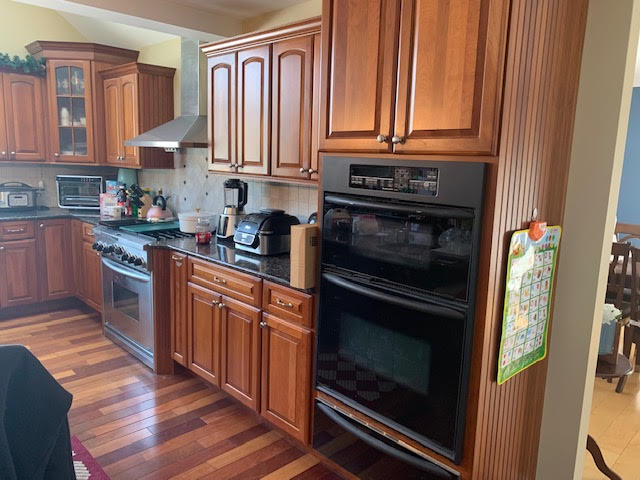
During
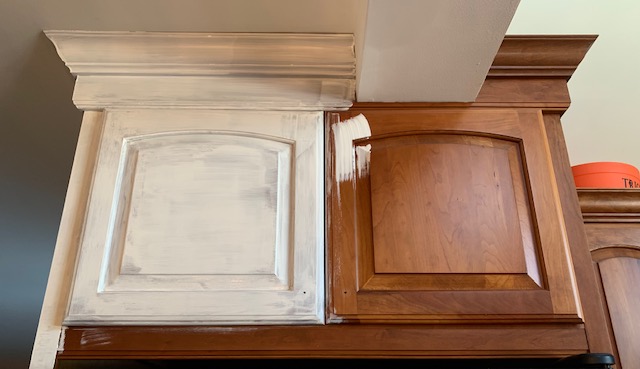
The first step was to pick out paint, and my goodness the options are endless! How is it even possible that there are about 45 different shades of black?! After much deliberation and votes cast by family and friends, I finally settled on Benjamin Moore Onyx - I wanted a sleek color that would complement the stainless-steel appliances and new black hardware for the cabinets (more on this later). I kept going back and forth on whether I wanted to do a complete one-color kitchen or if I wanted to go with a two-tone look, but after many many many internet searches, the two-tone is what I kept gravitating towards. Something about the contrast of colors really caught my eye.
After I grabbed all of my supplies, I started the leg work. I wiped all of the cabinets down with warm water and soap (I used Dawn Power Wash). I had a lot of those rubber door stoppers that had melted all over my cabinets (from the previous homeowner) and it took a lot of elbow grease to get all of that off...I may have cried multiple times just over this alone!! Once my cabinets were clean and dry, I checked them for cracks and rough surfaces. Fortunately, I have some really great wood cabinets that didn't need any sanding. I highly recommend taking the cabinet doors off for easy painting, but if you're afraid of stripping the screw holes, use a very small paint brush to get behind the doors (where they open and close).
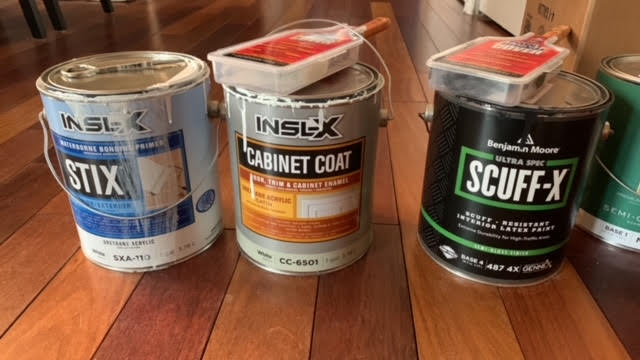
Now it was time to paint!! Well, primer first, of course. I did two coats of this because I have darker cabinets and I wanted the paint to cover fully. I worked in sections because I have a 5-year-old and 3-year-old, so completely closing off my kitchen was definitely not an option. This ended up being a good thing, though, because I could see how the kitchen was coming together piece by piece, and this gave me the motivation to push through when I felt like giving up!
I waited 24 hours between priming and painting to ensure that the primer was completely dry. For the top cabinets, I used INSL-X Cabinet Coat Enamel in Satin because I didn't want a glossy finish (but you can use a gloss if you like that look!). I did 2-3 coats of this, and I opted for using a paintbrush the entire time - I tried a roller but it just didn't paint the way I wanted it to, and I didn't like how it was drying. It definitely took longer this way, but I'm glad that I did it because it looks so much nicer...totally worth the extra bit of effort! The bottom cabinets are the Benjamin Moore Onyx, and I also did 2-3 coats of this.
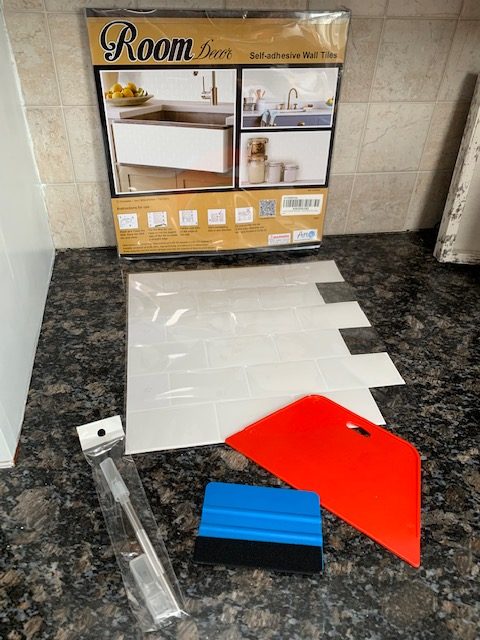
In between drying time, I worked on my backsplash. I knew it wasn't in my budget to redo the entire thing with tile, so I went with peel-and-stick subway tile (I used this in my DIY bathroom remodel, and it has held up so well that I knew I wanted to use the same brand for my kitchen). I would have loved to do the backsplash with real tile, but this semipermanent solution is a great substitute and I seriously love it so much!! Plus, it's way less expensive and that's always a win.
I highly recommend grabbing these tools to help cut and smooth out your backsplash (these were a lifesaver for me). I used about seven and a half of the tile sheets for my entire kitchen/desk area. *Tip: have patience and work slowly - this stuff is sticky and will adhere to most surfaces pretty easily, so if you mess up and you're working on paint/sheetrock surfaces it will rip the area. However, if you're covering it up anyway, it's not a big deal...you'll just lose some peel-and-stick along the way.
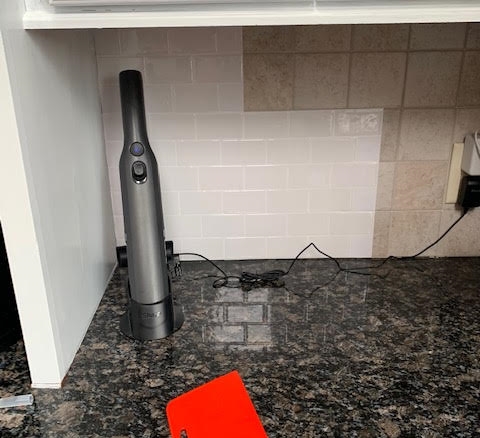
Prior to peeling the back off, I made sure to measure the pieces. I simply put the backsplash up against the surface I was working on and used my cutting tool to make slits where I needed to cut. Working around electrical outlets was a little tricky, but I found it easier to cut a hole in the peel-and-stick where the outlet would be instead of cutting individual pieces of peel-and-stick to place around the outlet. Once the peel-and-stick was on I used the smoother to get rid of any air bubbles.
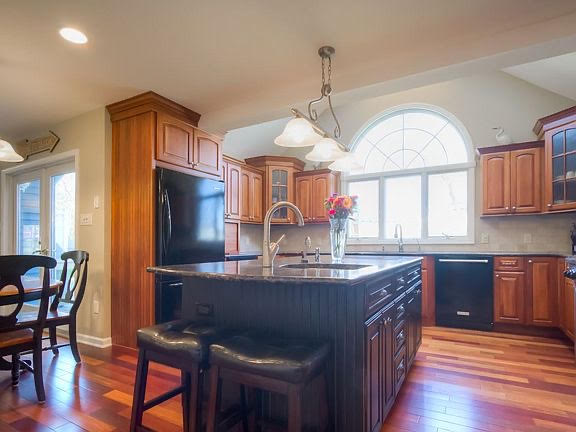
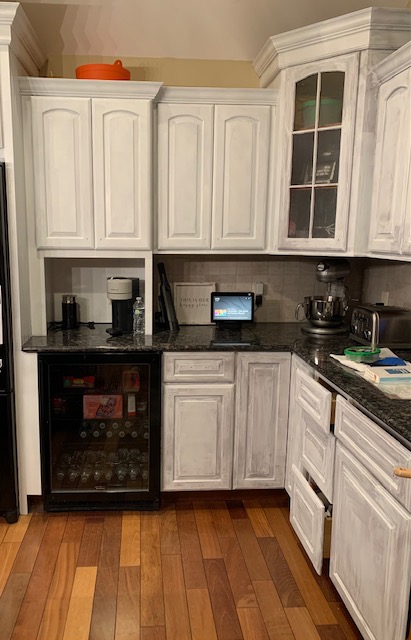
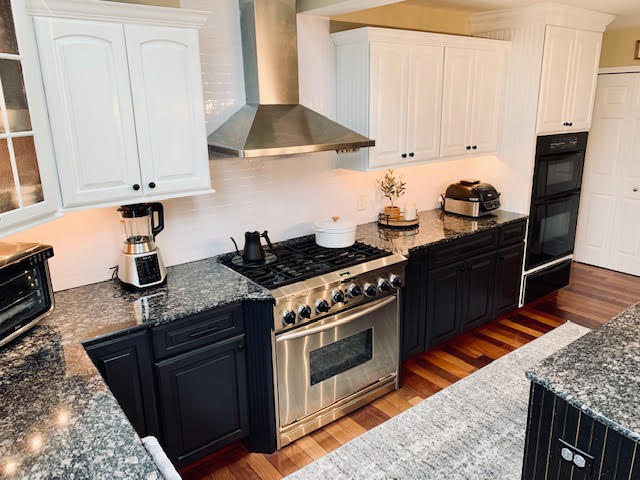
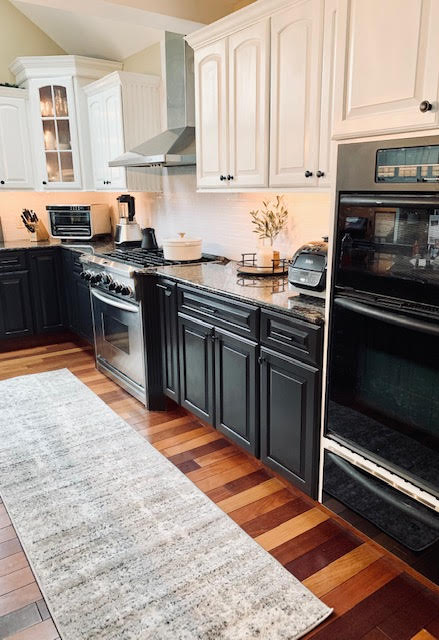
After
And just like that, a brand-new kitchen! Okay well, it was definitely a long month of paint strokes and sore body parts, but it was worth every minute of work that I put into it!! I feel as if I live in a completely different home and every person who has stepped foot in my kitchen since the remodel has said it is so much brighter and looks way bigger. The darker color on my bottom cabinets has really brought out my wood floors and dark granite countertops, and this transformation has given me a new-found appreciation for them, too. I've wished for so long that I had different floors and white granite countertops, but this new look really flows well and I couldn't be happier.
As an FYI, I have not done any sealant on the cabinets (I was told the paint I used would resist water and can be easily cleaned without damage). I can say that it's been a few weeks and I have already cleaned milk, juice, and water off of these doors MULTIPLE times (again, kids) and they have not been affected at all. Benjamin Moore paint is meant for cabinets without any top coat - at least that's what I've been told!
I previously had silver knobs and pull handles but I figured if was redoing everything, it was going to be everything. I found some great pulls and knobs (and these handles for my island) on Amazon, but you can go to your local Home Depot, Lowes, or any hardware store to find new cabinet hardware. *Tip: make sure you measure out your old fixtures before purchasing new ones...I had no idea I had two different sizes with my island drawer handles and my drawer handles throughout the kitchen. Beginner's mistake!
I wanted to add a couple of kitchen rugs that would soften the space and help tie the floors into the cabinet and countertop color scheme. I went with this gray and white patterned runner because it matched perfectly but would also hide dirt and spills pretty easily. I got a smaller matching one for in front of the sink, too.
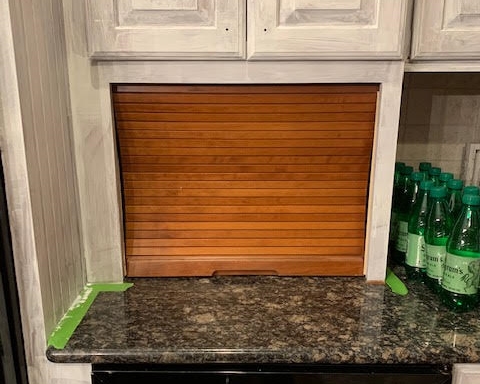
One of my favorite things in my new kitchen is this cute little coffee station. There used to be a roll-down door here (it's in one of the photos above) and I kept seldom-used appliances in here, but I decided to remove the door and make it into a mini cafe! My morning cup of coffee is even more enjoyable now that I get to make it here.
If you think that you can't do this or that you don't have what it takes - take the leap of faith!! There may be some tears (happy, sad, and frustrated) and definitely a few bad words, but the finished product will bring you so much joy and relief it will all be worth it. And if I can do it with two toddlers and zero knowledge of doing something like this, you DEFINITELY can do it.
fdonovan913 posted: " It's that time of year when the weather is getting nicer and you'll spend hours trying to convince your kids to put down the iPads and get outside for some much needed fresh air! If you're struggling to find fun outdoor activities for your littles, we've"
It's that time of year when the weather is getting nicer and you'll spend hours trying to convince your kids to put down the iPads and get outside for some much needed fresh air! If you're struggling to find fun outdoor activities for your littles, we've rounded up some enticing options that will provide endless afternoons of entertainment. See our roundup below.
Toys and Games
Frugal and Thriving may earn a small commission via affiliate links in this post. See full disclosure here.
Your kiddos will be entertained while building hand-eye coordination, dexterity, and critical thinking skills. They can tend to a butterfly garden, play a game of frisbee golf or Connect 4, or build their very own rocket launcher!
Add a (semi)permanent play fixture to your backyard so the kids can play time and time again. A swing set, basketball hoop, or inflatable pool for those sweltering summer days are all wonderful options!
DIY Birdfeeders
And if you're looking for an easy hands-on activity you can do with your kids, these DIY birdfeeders are great for spring!!